Ad Blocking for VPN Clients With Unbound
Intro and why
I want to give up 80% of my internet bandwith to watch ads. – said no one ever
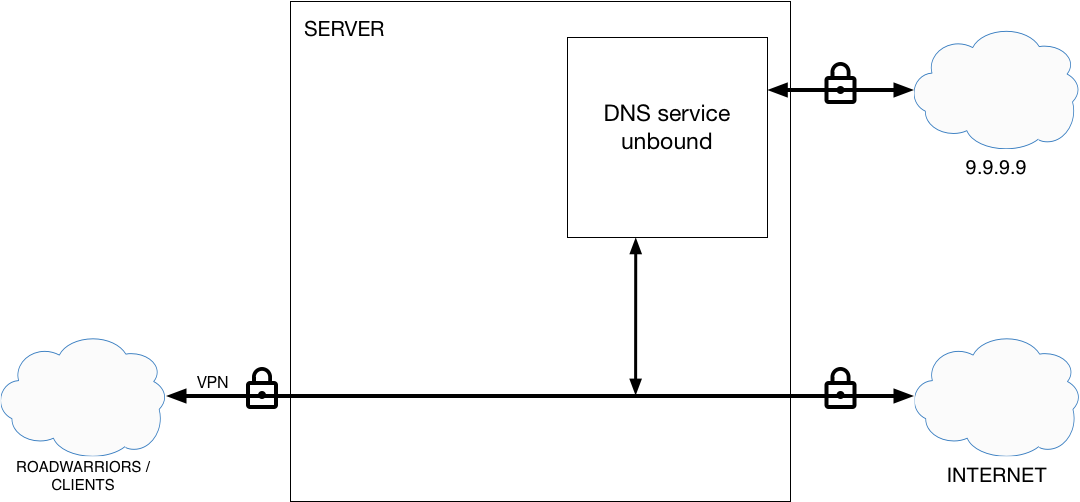
For more than a year, I am using my own VPN solution based on Strongswan, whenever I connect to unknown and/or untrusted wifi networks with my devices. Basically that means I am enforcing safe encrypted path for my data on every network that I don’t control.
One of the minor inconveniences were the commercial breaks in youtube videos, sure I could block the ads on the device, but good luck doing that in youtube app on iOS.
Just the other day, I was reading again about pi-hole project and found it very interesting, some cases stated even using it as a DNS server with VPN tunnels. That got me thinking, I want to block ads with DNS too, when i use VPN!
I already run an unbound DNS server instance on my VPS server, albeit only local, to be used by rspamd to cache addresses and kill spam quicker, but what can I do to reuse the service to block ads?
Sure I could just open the DNS server to the public queries and welcome any requests on the UDP port 53 from the wild, but I somehow did not want that.
The idea was born, time was to implement it:
- obtain a hosts file with ad blocking
- load that data into the DNS server
- force VPN clients to use my own DNS server
Network interfaces
The loopback network interface
To make the DNS server visible and accessible to the VPN clients, I turned for some help and user ecdsa on superuser.com came to the rescue (big thanks). He infused the idea of assigning the first IP in the VPN IP range to the server as a loopback interface and then exclude that IP from VPN IP provisioning. Source.
On Debian, one can edit the /etc/network/interfaces file and add a local interface:
vim /etc/network/interfaces
auto lo
iface lo inet loopback

iface lo inet static
    address 10.10.10.1
    netmask 255.255.255.0
    network 10.10.10.0
Restart the networking service:
service networking restart
For testing purposes you can also use this command to invoke the interface, but it will be gone at the next reboot:
ip addr add 10.10.10.1 dev lo
Strongswan/ipsec
The IP range for VPN clients is defined in /etc/ipsec.conf the important part is the rightsourceip that defines the range of IP addresses to lease to the VPN clients. It has to be one higher than the server IP you have assigned in the last step. The other iportant setting is rightdns that defines which DNS server will the clients use, here we force our own.
...
    rightdns=10.10.10.1
    rightsourceip=10.10.10.2/24
...
Restart the service:
service ipsec restart
Wireguard
I have replaced Strongswan/ipsec with Wireguard
vim /etc/wireguard/wg0.conf
[Interface]
Address = 10.10.10.1/24
ListenPort = 51820
PrivateKey = server-private-key

# Device 1
[Peer]
PublicKey = device1-public-key
AllowedIPs = 10.10.10.4/32

# Device 2
[Peer]
PublicKey = device2-public-key
AllowedIPs = 10.10.10.5/32

...
Unbound
Listening interface
Next, we need to make sure unbound is listening on our new interface, we can configure that in the /etc/unbound/unbound.conf file.
...
    interface 10.10.10.1
...
Access control
In the same file, we need to allow DNS queries from IP addresses in our VPN IP segment.
...
    access-control: 10.10.10.0/24 allow
...
TLS and forwarding
Our DNS server makes recursive inquires if the requested domain is not in cache, by default the requests are in plain text and as such, susceptible to eavesdropping. In this example I am using Quad9 DNS servers. To encrypt the forward requests add the following in the unbound.conf:
forward-zone:
    name:"."
    forward-addr:9.9.9.9@853
    forward-ssl-upstream:yes
Block list
EDIT (29.05.2019): I have created a little script and put it up on github.
I think we are all aware that if you want to block unwanted content with the use of the hosts file on your operating system, the best bet is to get the file from Steven Black. It is a true drop in replacement and works as a charm. So for start, lets obtain the file and store it on the disk. I will use /var/unbound folder for this.
$ wget https://raw.githubusercontent.com/StevenBlack/hosts/master/hosts
As the file is in fact hosts file and not unbound configuration fragment, we need to convert the syntax:
$ cat hosts | grep '^0\.0\.0\.0' | awk '{print "local-zone: \""$2"\" redirect\nlocal-data: \""$2" A 0.0.0.0\""}' > ads.conf
After we set up the DNS server, we need to restart the service:
service unbound restart
Apparmor
Another thing, if you use apparmor, you need to enable the usage of the folder where you will keep the modified hosts entries file.
$ vim /etc/apparmor.d/local/usr.sbin.unbound
Add (replace the file with your own path):
/var/unbound/ads.conf rw,
Restart/reload both services.
In case you are using Apparmor:
$ apparmor_parser -r /etc/apparmor.d/usr.sbin.unbound
$ service unbound restart
Firewall
The last thing we need to do is to allow UDP input traffic from the VPN subnet IP addresses to the DNS server running locally:
$ iptables -A INPUT -s 10.10.10.2/24 -d 10.10.10.1 -p udp -m udp --dport 53 -j ACCEPT -m comment --comment "DNS unbound over VPN"
Running iptables -Lvn should yield this line:
Chain INPUT (policy ACCEPT 0 packets, 0 bytes)
 pkts bytes target     prot opt in     out     source               destination
   70  4572 ACCEPT     udp  --  *      *       10.10.10.0/24        10.10.10.1           udp dpt:53 /* DNS unbound over VPN */
Monitoring in Grafana
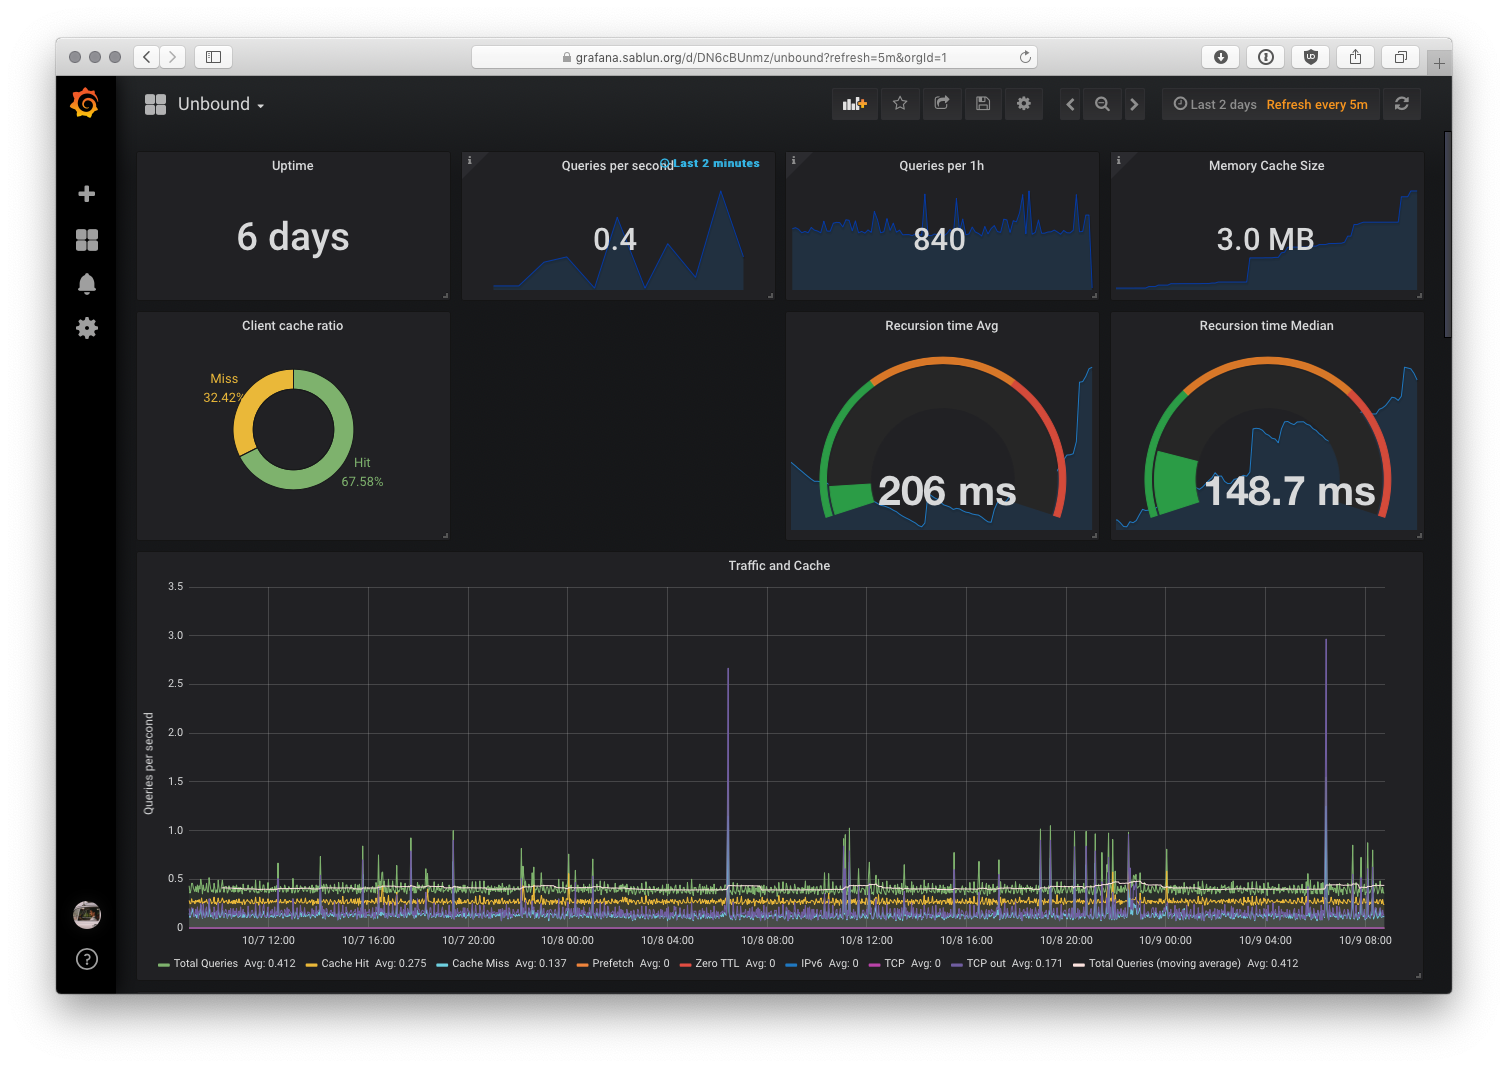
Telegraf
Add this fragment to /etc/telegraf/telegraf.conf:
# A plugin to collect stats from the Unbound DNS resolver
[[inputs.unbound]]
  ## Address of server to connect to, read from unbound conf default, optionally ':port'
  ## Will lookup IP if given a hostname
  server = "127.0.0.1"

  ## If running as a restricted user you can prepend sudo for additional access:
  use_sudo = true

  ## The default location of the unbound-control binary can be overridden with:
  # binary = "/usr/sbin/unbound-control"

  ## The default timeout of 1s can be overriden with:
  # timeout = "1s"

  ## When set to true, thread metrics are tagged with the thread id.
  ##
  ## The default is false for backwards compatibility, and will be change to
  ## true in a future version.  It is recommended to set to true on new
  ## deployments.
  thread_as_tag = true
Changelog
- 30/05/2024: Fixed headers, added Wireguard info, reorganized sections.